Kotlin CoroutinesでCoroutineScope.launchの処理を追う
これは何?
kotlinx.coroutinesは並行処理のためのライブラリです。このライブラリを利用するとThreadやRunnableといったものをあまり意識せずに並行処理を実現できます。Androidアプリ開発をしていると「viewModelScopeでlaunchしてsuspend関数を呼べばいいか」という程度に終わってしまいがちです。もう少しライブラリ内の理解をした上で使いたいと思いlaunch調査しました。私の予想では必ずThreadやRunnableはどこかで現れるはずです。ライブラリの中を探索しながらそれらの処理を探していきます。まずはCoroutinesとは何かを確認した上で、launchの処理を読んで行きます。
そもそもCoroutineって何?
Coroutineの概念はKotlinで生まれたものではなく、1950年代末にMelvin Conwayによって考案され、1963年に発表されました。もともとはCOBOL コンパイラ内部の処理を協調させるための制御構造として提案されたもので、処理を途中でsuspendし、状態を保持したまま後からresumeできることが基本的な特徴です。実はThreadよりも起源が古く、Threadの台頭により下火になりましたが、2000年代前半からまた注目され始めました。
普通のプログラムの関数をSubroutine(サブルーチン)と呼びます。関数Aから関数Bを呼び出すと、関数Aと関数Bには親子関係になります。関数Bが最後まで実行されたら関数Aに戻ります。
Coroutine(コルーチン)はSubroutineのような固定のcall/returnの親子関係はありません。Coroutineは中断と再開が可能な実行単位であり、CoroutineAを中断している間に、CoroutineBを実行し、CoroutineBが完了したら、CoroutineAを再開するようなことが可能になります。Co-routineのColaborationの協調の意味だと捉えると理解が捗ります。
ProcessとThreadって何?
Processはアプリケーションそのものです。GoogleChromeを実行していたらGoogleChromeで1つのProcessを持ちます。
ThreadはOSがCPUに処理を依頼する実行単位です。
Process
└─ 仮想アドレス空間
   ├─ Code / Text領域
   ├─ Data領域
   ├─ Heap                    ← Thread間で共有
   ├─ Stack領域 A             ← Thread Aが使用
   ├─ Stack領域 B             ← Thread Bが使用
   ├─ Stack領域 C             ← Thread Cが使用
   └─ 共有ライブラリなど

Thread A → Stack領域 Aを使う
Thread B → Stack領域 Bを使う
Thread C → Stack領域 Cを使う
Heap領域はThread間で共有の領域です。Stack領域はThread毎に持ちます。HeapはProcessのライフサイクルに紐付き、StackはThreadのライフサイクルに紐付きます。
Process
├─ Main Thread
│     │
│     └─ Thread生成を要求
│
└─ Worker Thread
Processが起動するとそのプロセスのメモリ領域を確保します。Processが起動するとMain ThreadというThreadの実行が開始されます。Main ThreadがRuntime/OSに新しいThreadの要求をするとWorker Threadが生成されます。
Thread間に親子関係は無い点に注意です。Main ThreadがOSに新しいThreadの作成を要求しただけであってMain ThreadとWorker Threadに親子関係はありません。同じProcessに属するThreadという関係性です。
改めてCoroutineって?
ProcessとThreadの関係性を見た上で、Coroutineを考えると理解が捗ります。
Coroutineは処理の中断と再開ができる実行単位でした。処理の実行はThread単位で行われます。つまり何者かがうまくCoroutineとThreadと間に立ち、スケジューリングするとCoroutineを止めたり再開したりしながら効率的に処理を進めることができるはずです。そのような予想のものkotlinx.coroutinesのライブラリを見ていきます。
CoroutineScheduler/Continuation
ThreadとCoroutineの間でスケジューリングするという概念が見えてきました。
これらのスケジューリングを行う仕組みとして、kotlinx.coroutines には CoroutineScheduler があります。ライブラリにはWorkerという Thread を継承した独自のクラスと、CoroutineSchedulerが実行単位として扱うRunnableを継承したTaskというクラスが存在します。CoroutineSchedulerはTaskをQueueで管理し、WorkerがQueueからTaskを取り出して実行します。Workerはwhileループで実行可能なTaskの検索と実行を行い続けています。
ただし、CoroutineSchedulerを利用するかどうかはDispatcherに依存します。Dispatchers.MainであればCoroutineSchedulerは利用せず、MainLooperに処理を依頼することで実行します。
一方、Coroutineの中断と再開を支えているのがContinuationです。ContinuationはKotlin標準ライブラリに定義されたインターフェースです。Kotlin Compilerはsuspend関数やsuspend lambdaをコンパイルするときに、「Continuationを利用した状態機械」へ変換します。これによって、処理を途中で中断し、後から続きから再開できます。
kotlinx.coroutinesには、このContinuationとTaskを橋渡しする DispatchedContinuationというクラスがあります。DispatchedContinuationは内部に Continuation を保持しつつ、DispatchedTaskを継承しています。DispatchedTaskは Runnableとして実行可能です。
CoroutineScheduler#dispatch は受け取った Runnable を内部で Task として扱える形にし、Queueへ登録します。Worker ThreadはQueueからTaskを取り出して実行します。その実行を通じて最終的にContinuationがresumeされ、Coroutineの続きが実行されます。
CoroutineScheduler#dispatchの第一引数で受け取るRunnableはlaunch {}の{}(suspend runnable)そのものではありません。{}からKotlin Compilerによって作られたContinuationを実行するためのRunnableです。suspend lambdaは抽象クラスSuspendLambdaを継承したものがCompilerにより生成されます。
参考リンク
以上のことから、launchすることでDispatcher.IO/Defaultにおいては、コンパイル時に生成するSuspendLambda由来のContinuationがDispatchedContiuationにラップされ、最終的にRunnableとしてQueueにタスクとして詰まれ実行されることがわかりました。ただし、Dispatchers.Mainを利用した場合はMain Threadで実行されるためCoroutineSchedulerは利用しません。
CoroutineScheduler ... QueueでTaskを管理しWorkerで実行 https://github.com/Kotlin/kotlinx.coroutines/blob/3eadf938b1506351bffd7c015445d08faf1c4315/kotlinx-coroutines-core/jvm/src/scheduling/CoroutineScheduler.kt#L92
Worker ... Threadを継承 https://github.com/Kotlin/kotlinx.coroutines/blob/master/kotlinx-coroutines-core/jvm/src/scheduling/CoroutineScheduler.kt#L595
Continuation ... resumeWithで中断と再開を定義 https://github.com/JetBrains/kotlin/blob/ef267439e724df8bf276f269fdc28efc9d86f2b6/libraries/stdlib/src/kotlin/coroutines/Continuation.kt#L16
SuspendLambda ... Suspension lambda用の抽象かする https://github.com/JetBrains/kotlin/blob/c3ec26bc51bd762960d47c856e4fe659a61ec41c/libraries/stdlib/jvm/src/kotlin/coroutines/jvm/internal/ContinuationImpl.kt#L157
BaseContinuationImpl https://github.com/JetBrains/kotlin/blob/master/libraries/stdlib/jvm/src/kotlin/coroutines/jvm/internal/ContinuationImpl.kt
DispatchedContinuation.kt ... TaskとContinuationの橋渡し https://github.com/Kotlin/kotlinx.coroutines/blob/master/kotlinx-coroutines-core/common/src/internal/DispatchedContinuation.kt
DispatchedTask.kt ... ScheduleTaskを継承した抽象クラス https://github.com/Kotlin/kotlinx.coroutines/blob/3eadf938b1506351bffd7c015445d08faf1c4315/kotlinx-coroutines-core/common/src/internal/DispatchedTask.kt
SchedulerTask.kt...単にTask https://github.com/Kotlin/kotlinx.coroutines/blob/3eadf938b1506351bffd7c015445d08faf1c4315/kotlinx-coroutines-core/jvm/src/SchedulerTask.kt
CoroutineScope・CoroutineContext
ここまででkotlinx.coroutinesの内部でどのようにRunnableやThreadが管理されているかがざっくり理解することができました。ここからは普段のAndroidアプリ開発で利用するviewModelScope.launchから先ほどのCoroutineSchedulerにどのように辿り着くのか確認していきます。
public interface CoroutineScope {
    public val coroutineContext: CoroutineContext
}
まず、CoroutineScopeの定義を確認します。
CoroutineScopeはCoroutineを起動する範囲を表すオブジェクトです。CoroutineScopeはCoroutineContextを持っています。
viewModelScopeもこのCoroutineScopeを実装したクラスです。
public fun CoroutineScope.launch(
    context: CoroutineContext,
    start: CoroutineStart,
    block: suspend CoroutineScope.() -> Unit
): Job {

    // ScopeのContext + 指定されたContext ...①
    val newContext = newCoroutineContext(context)

    // Coroutineそのものを作る ...②
    val coroutine =
        StandaloneCoroutine(newContext, active = true)

    // 指定された開始方法でblockを開始 ...③
    coroutine.start(start, coroutine, block)

    return coroutine
}
launchメソッドを確認します。
CorotineScopeの拡張関数でlaunchは定義されています。①から③について見ていきます。
① newCoroutineContext
@ExperimentalCoroutinesApi
public actual fun CoroutineScope.newCoroutineContext(context: CoroutineContext): CoroutineContext {
    val combined = foldCopies(coroutineContext, context, true)
    val debug = if (DEBUG) combined + CoroutineId(COROUTINE_ID.incrementAndGet()) else combined
    return if (combined !== Dispatchers.Default && combined[ContinuationInterceptor] == null)
        debug + Dispatchers.Default else debug
}
引数で渡されたCoroutineContextとScopeが保持しているCoroutineContextをマージして新しく起動するCoroutine用のContextを作成します。これにより、親のScopeのDispatcherやJobなどの情報を引き継ぎつつ、launch側で指定したContextで上書き・追加ができます。
例えばViewModelが持つviewModelScopeは以下のようなメソッドでCoroutineContextを作成します。デフォルトではDispatchers.MainというCoroutineContextです。そのため、launchの第一引数のcontextでCoroutineContextを渡すとDispatchers.Main以外での実行も可能になります。
internal fun createViewModelScope(): CloseableCoroutineScope {
    val dispatcher =
        try {
            // In platforms where `Dispatchers.Main` is not available, Kotlin Multiplatform will
            // throw
            // an exception (the specific exception type may depend on the platform). Since there's
            // no
            // direct functional alternative, we use `EmptyCoroutineContext` to ensure that a
            // coroutine
            // launched within this scope will run in the same context as the caller.
            Dispatchers.Main.immediate
        } catch (_: NotImplementedError) {
            // In Native environments where `Dispatchers.Main` might not exist (e.g., Linux):
            EmptyCoroutineContext
        } catch (_: IllegalStateException) {
            // In JVM Desktop environments where `Dispatchers.Main` might not exist (e.g., Swing):
            EmptyCoroutineContext
        }
    return CloseableCoroutineScope(coroutineContext = dispatcher + SupervisorJob())
}
② StandaloneCoroutine
private open class StandaloneCoroutine(
    parentContext: CoroutineContext,
    active: Boolean
) : AbstractCoroutine<Unit>(parentContext, initParentJob = true, active = active) {
    override fun handleJobException(exception: Throwable): Boolean {
        handleCoroutineException(context, exception)
        return true
    }
}
StandaloneCoroutineはAbstractCoroutineを継承しています。
@OptIn(InternalForInheritanceCoroutinesApi::class)
@InternalCoroutinesApi
public abstract class AbstractCoroutine<in T>(
    parentContext: CoroutineContext,
    initParentJob: Boolean,
    active: Boolean
) : JobSupport(active), Job, Continuation<T>, CoroutineScope
AbstractCoroutineはContinuationでありJobでもあります。前述でsuspend lambdaからSuspendLambdaというContinuationがCompilerによって自動生成されると記載しましたが、StandaloneCoroutineはContinuation
③ coroutine.start
// start: CoroutineStart
// continue: StandaloneCoroutine
// block: suspend CoroutineScope.() -> Unit
coroutine.start(start, coroutine, block)
StandaloneCoroutine.startで実行を開始しようとしていることがわかります。
AbstractCoroutineでstartの処理が定義されているため、thisはAbstractCoroutineとなります。
public fun <R> start(start: CoroutineStart, receiver: R, block: suspend R.() -> T) {
    // MEMO: R: CoroutineScope、実態はStandaloneCoroutine
    //       T: Unit
    //       receiver:R
    //       this: AbstractCoroutine<Unit>、実体は StandaloneCoroutine
    start(block, receiver, this)
}
startは第一引数のstart.invokeをしていることがわかります。
@InternalCoroutinesApi
public operator fun <R, T> invoke(block: suspend R.() -> T, receiver: R, completion: Continuation<T>): Unit =
    // MEMO: R: CoroutineScope、実態はStandaloneCoroutine
    //       T: Unit
    //       completion: Continuation<Unit>、実態はStandaloneCoroutine
    when (this) {
        DEFAULT -> block.startCoroutineCancellable(receiver, completion)
        ATOMIC -> block.startCoroutine(receiver, completion)
        UNDISPATCHED -> block.startCoroutineUndispatched(receiver, completion)
        LAZY -> Unit // will start lazily
    }
launchメソッドに第二引数のstartはCoroutineStartというenumクラスであり、上記のようなinvokeメソッドが定義されています。
基本的にDEFAULTで動かすと思うのでDEFAULTのケースを見ると、block.startCoroutineCancellable(receiver, completion)を実行していることがわかります。suspend R.() -> TにはstartCoroutineCancellableという関数が生えていることがわかります。この定義はCancellable.ktで定義されています。
この辺りで頭が混乱するので、改めて現状を整理すると
- blockはlaunchに渡した suspend lambdaです
- receiverはlaunch内で生成した StandaloneCoroutineです。StandaloneCoroutineはCoroutineScopeを継承しているため型が一致します。
- completionはlaunch内で生成した StandaloneCoroutineです。StandaloneCoroutineはContinuation
を継承しているため型が一致します。
// MEMO: R: CoroutineScope、実態はStandaloneCoroutine
//       T: Unit
//       receiver: CoroutineScope、実態はStandaloneCoroutine
//       completion: Continuation<Unit>、実態はStandaloneCoroutine
internal fun <R, T> (suspend (R) -> T).startCoroutineCancellable(
    receiver: R, completion: Continuation<T>,
) = runSafely(completion) {
    createCoroutineUnintercepted(receiver, completion).intercepted().resumeCancellableWithInternal(Result.success(Unit))
}
runSafelyはlambdaを実行し失敗すればcompletionに失敗を通知します。
@SinceKotlin("1.3")
public actual fun <R, T> (suspend R.() -> T).createCoroutineUnintercepted(
    receiver: R,
    completion: Continuation<T>
): Continuation<Unit> {
    val probeCompletion = probeCoroutineCreated(completion)
    return if (this is BaseContinuationImpl)
        create(receiver, probeCompletion)
    else {
        createCoroutineFromSuspendFunction(probeCompletion) {
            (this as Function2<R, Continuation<T>, Any?>).invoke(receiver, it)
        }
    }
}createCoroutineUninterceptedはKotlin側に定義されているメソッドです。Continuationを作成します。launch {} のような通常のsuspend lambdaは、Compilerが SuspendLambda を継承するクラスとして生成するため、BaseContinuationImplでもあります。そのため通常はこちらの create(receiver, probeCompletion) に入ります。このcreateメソッドはBaseContinuationImplに存在します。
public open fun create(value: Any?, completion: Continuation<*>): Continuation<Unit> {
    throw UnsupportedOperationException("create(Any?;Continuation) has not been overridden")
}
BaseContinuationImplのケースはKotlin Compilerによる自動生成で生成されたcreateメソッドが呼ばれるはずです。
viewModelScope.launch {
    println("A")
    delay(1000)
    println("B")
}

final class GeneratedLambda(
    completion: Continuation<Unit>?
) : SuspendLambda(
    arity = 2,
    completion = completion
) {

    private var label = 0
    private var p$: CoroutineScope? = null

    override fun create(
        value: Any?,
        completion: Continuation<*>
    ): Continuation<Unit> {

        val result = GeneratedLambda(
            completion as Continuation<Unit>
        )

        // receiverを保存
        result.p$ = value as CoroutineScope

        return result
    }

    override fun invokeSuspend(result: Any?): Any? {
        when (label) {
            0 -> {
                throwOnFailure(result)

                val scope = p$!!

                println("A")

                label = 1

                if (delay(1000, this) === COROUTINE_SUSPENDED) {
                    return COROUTINE_SUSPENDED
                }
            }

            1 -> {
                throwOnFailure(result)
            }

            else -> {
                error("call to 'resume' before 'invoke' with coroutine")
            }
        }

        println("B")
        return Unit
    }
}
AIに生成してもらったKotlin Compilerによって生成されたLambdaの実装が上記です。
labelでどこまで進んだのかを管理しており、途中で再開できるようにしていることがわかります。
// MEMO: R: CoroutineScope、実態はStandaloneCoroutine
//       T: Unit
//       receiver: CoroutineScope、実態はStandaloneCoroutine
//       completion: Continuation<Unit>、実態はStandaloneCoroutine
internal fun <R, T> (suspend (R) -> T).startCoroutineCancellable(
    receiver: R, completion: Continuation<T>,
) = runSafely(completion) {
    createCoroutineUnintercepted(receiver, completion).intercepted().resumeCancellableWithInternal(Result.success(Unit))
}この実装に戻ります。createCoroutineUninterceptedでContinuationを作成しました。launch {}で渡したsuspend lambdaの状態のインスタンスでした。しかし次にinterceptedを呼んでいます。interceptedはContinuationを返却します。これはどういう意味なのでしょうか?
@SinceKotlin("1.3")
public actual fun <T> Continuation<T>.intercepted(): Continuation<T> =
    (this as? ContinuationImpl)?.intercepted() ?: this
interceptedの定義はこちらです。ContinuationImplの場合はinterceptedを呼び、それ以外の場合は自分自身を返却しています。
ここでContinuationを実装した各抽象クラスについて整理します。
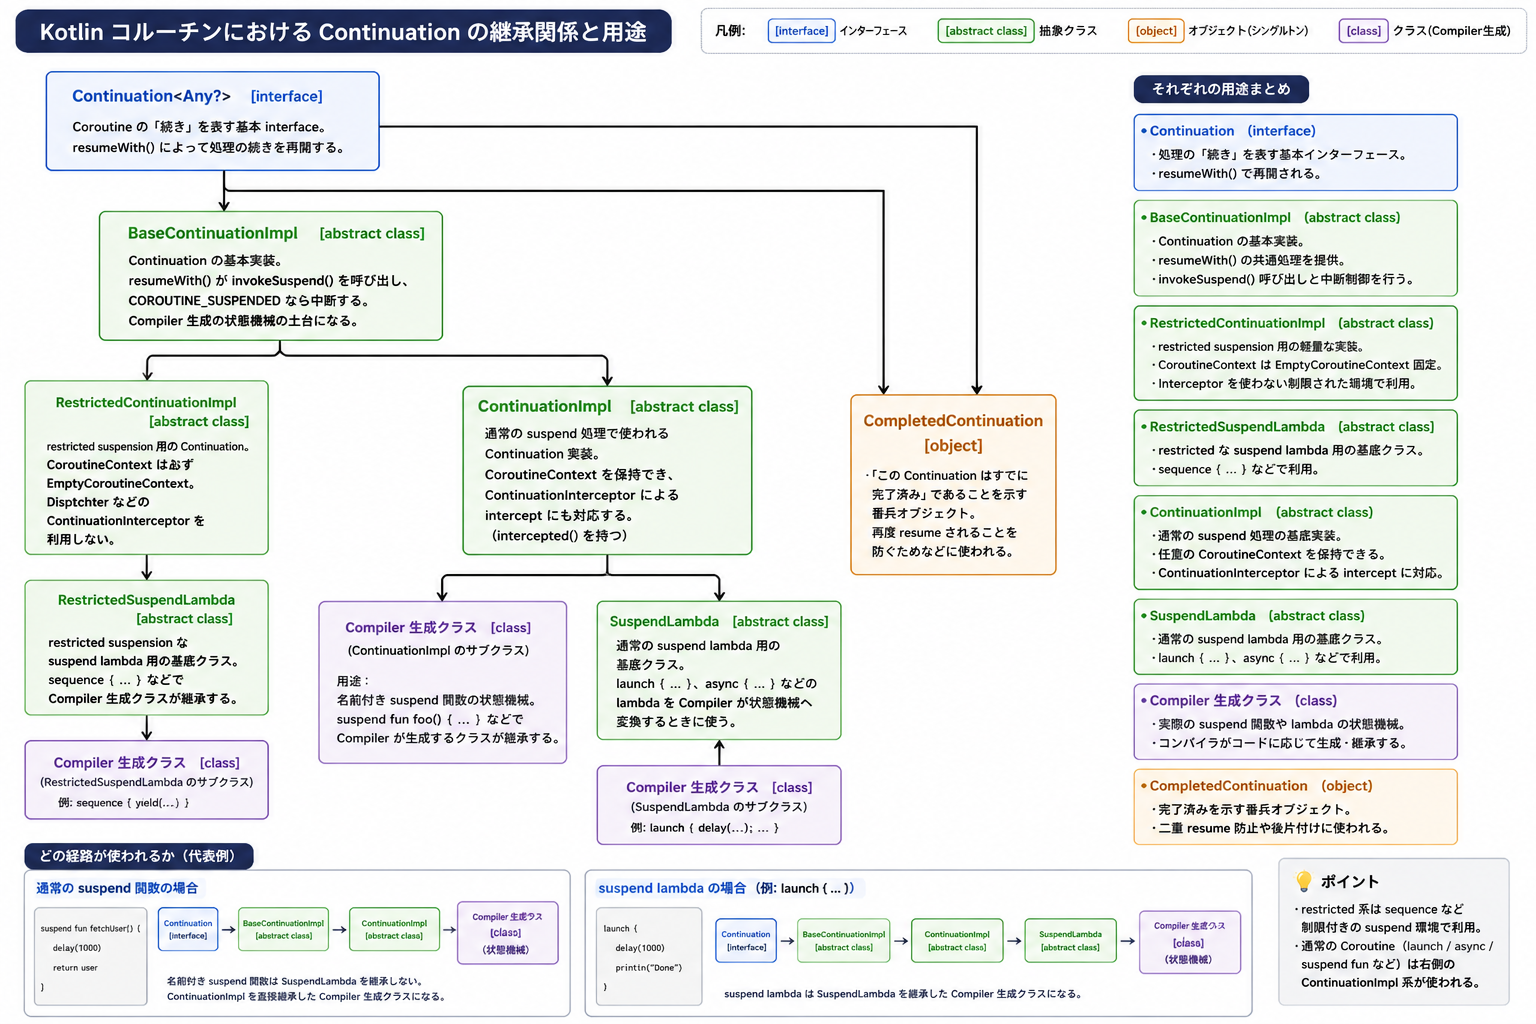
Restricted系は一旦無視して、BaseContiuationImplが全ての基底クラスになっていることがわかります。
ContinuationImpl系は通常のsuspend関数 or suspend lambdaのための基底クラスになっていることもわかります。
suspend関数はContinuationImplを継承して作成され、suspend lambdaはSuspendLambdaを継承して作成されることもわかります。
interceptedの話に戻ると、ContinuationImplであるということは通常のsuspend関数・suspend lambdaの場合を表していることがわかります。つまりinterceptedメソッドはContinuationImplに定義されています。
public fun intercepted(): Continuation<Any?> =
    intercepted
        ?: (context[ContinuationInterceptor]?.interceptContinuation(this) ?: this)
            .also { intercepted = it }
ContinuationImplのintercepted関数の処理を見てみます。CoroutineContextからContinuationInterceptorを取得しています。
@SinceKotlin("1.3")
public interface ContinuationInterceptor : CoroutineContext.Element {
    /**
     * The key that defines *the* context interceptor.
     */
    public companion object Key : CoroutineContext.Key<ContinuationInterceptor>
    ...
}ContinuationInterceptorはKeyというcompanion objectを持っており、Kotlinの言語仕様で型が一致するcompanion objectを自動で探す機能のおかげで、context[ContinuationInterceptor.Key]ではなく、context[ContinuationInterceptor]で取得できます。
では次にContinuationInterceptorとはどのようなものか、実装クラスはどのようなものがあるか見ていきます。
ContinuationInterceptorを継承した抽象クラスにはCoroutineDispatcherがあります。CoroutineDispatcherはAndroidエンジニアも馴染み深いMain、IO、Defaultの基底クラスです。CoroutineDispatcher#interceptContinuationを見てます。
public final override fun <T> interceptContinuation(continuation: Continuation<T>): Continuation<T> =
        DispatchedContinuation(this, continuation)
この関数ではDispatchedContinuationというクラスで引数で渡したContinuationをラップして返却しています。DispatchedContinuationはDispatchedTaskを継承しており、JVMでは最終的にRunnableとしてDispatcherへ渡せます。次にconstructorをチェックしてみます。
internal class DispatchedContinuation<in T>(
    @JvmField internal val dispatcher: CoroutineDispatcher,
    @JvmField val continuation: Continuation<T>
) : DispatchedTask<T>(MODE_UNINITIALIZED), CoroutineStackFrame, Continuation<T> by continuation
第一引数でCoroutineDispatcher、つまり、ContinuationInterceptorを実装したクラスを必要としており、
第二引数でContinuationを必要としています。DispatchedContinuationの一部処理は第二引数のcontinuationに移譲されています。
// MEMO: R: CoroutineScope、実態はStandaloneCoroutine
//       T: Unit
//       receiver: CoroutineScope、実態はStandaloneCoroutine
//       completion: Continuation<Unit>、実態はStandaloneCoroutine
internal fun <R, T> (suspend (R) -> T).startCoroutineCancellable(
    receiver: R, completion: Continuation<T>,
) = runSafely(completion) {
    createCoroutineUnintercepted(receiver, completion).intercepted().resumeCancellableWithInternal(Result.success(Unit))
}
改めてstartCoroutineCancellableに戻ると、createCoroutineUninterceptedでContinuationを作成し、interceptedでそのContinuationをDispatchedContinuationにラップいることがわかりました。では次にresumeCancellableWithInternalを見ていきます。
internal fun <T> Continuation<T>.resumeCancellableWithInternal(
    result: Result<T>,
): Unit = when (this) {
    is DispatchedContinuation -> resumeCancellableWith(result)
    else -> resumeWith(result)
}
resumeCancellableWithはContinuationの再開を始める処理だと命名からわかります。再開途中の結果としては引数で渡したUnitであることもわかります。次に、DispatchedContinuationなので今回はresumeCancellableWith(result)を確認します。
// We inline it to save an entry on the stack in cases where it shows (unconfined dispatcher)
// It is used only in Continuation<T>.resumeCancellableWith
@Suppress("NOTHING_TO_INLINE")
internal inline fun resumeCancellableWith(result: Result<T>) {
    val state = result.toState()
    if (dispatcher.safeIsDispatchNeeded(context)) {
        _state = state
        resumeMode = MODE_CANCELLABLE
        dispatcher.safeDispatch(context, this)
    } else {
        executeUnconfined(state, MODE_CANCELLABLE) {
            if (!resumeCancelled(state)) {
                resumeUndispatchedWith(result)
            }
        }
    }
}
resumeCancellableWithは上記です。dispatcherはDispatchedContinuationが保持しているCoroutineDispatcherです。CoroutineDispatcherはContinuationInterceptorを実装しています。
// kotlinx-coroutines-core/common/src/internal/DispatchedContinuation.kt
internal fun CoroutineDispatcher.safeIsDispatchNeeded(context: CoroutineContext): Boolean {
    try {
        return isDispatchNeeded(context)
    } catch (e: Throwable) {
        throw DispatchException(e, this, context)
    }
}

// kotlinx-coroutines-core/common/src/CoroutineDispatcher.kt
public abstract class CoroutineDispatcher {
    public open fun isDispatchNeeded(context: CoroutineContext): Boolean = true
}
safeIsDispatchNeededはCoroutineDispatcherのisDispatchNeededを呼び、例外をDispatchExceptionとしてthrowすることがわかります。 isDispatchNeededはCoroutineDispatcherに定義されており、デフォルトはtrueですが、具象クラスに具体的なoverrideしている可能性があります。
public actual object Dispatchers {
    @JvmStatic
    public actual val Default: CoroutineDispatcher = DefaultScheduler

    @JvmStatic
    public actual val Main: MainCoroutineDispatcher get() = MainDispatcherLoader.dispatcher

    @JvmStatic
    public actual val Unconfined: CoroutineDispatcher = kotlinx.coroutines.Unconfined

    @JvmStatic
    public val IO: CoroutineDispatcher get() = DefaultIoScheduler
}isDispatchNeededはDispatchders.DefaultはDefaultScheduler、Dispatchers.IOについてはDefaultIoSchedulerを利用しており、DefaultSchedulerとDefaultIoSchedulerはisDispatchNeededをoverrideしていません。MainDispatcherLoader.dispatcherを確認してみます。
internal object MainDispatcherLoader {

    private val FAST_SERVICE_LOADER_ENABLED = systemProp(FAST_SERVICE_LOADER_PROPERTY_NAME, true)

    @JvmField
    val dispatcher: MainCoroutineDispatcher = loadMainDispatcher()

    private fun loadMainDispatcher(): MainCoroutineDispatcher {
        return try {
            val factories = if (FAST_SERVICE_LOADER_ENABLED) {
                FastServiceLoader.loadMainDispatcherFactory()
            } else {
                // We are explicitly using the
                // `ServiceLoader.load(MyClass::class.java, MyClass::class.java.classLoader).iterator()`
                // form of the ServiceLoader call to enable R8 optimization when compiled on Android.
                ServiceLoader.load(
                        MainDispatcherFactory::class.java,
                        MainDispatcherFactory::class.java.classLoader
                ).iterator().asSequence().toList()
            }
            @Suppress("ConstantConditionIf")
            factories.maxByOrNull { it.loadPriority }?.tryCreateDispatcher(factories)
                ?: createMissingDispatcher()
        } catch (e: Throwable) {
            // Service loader can throw an exception as well
            createMissingDispatcher(e)
        }
    }
}loadMainDispatcherではMainCoroutineDispatcherのFactoryをClassLoaderから探していることがわかります。jvmだと実行環境が様々あるためMainが環境ごとに異なるためだと思います。Androidの場合はkotlinx-coroutines-androidにMainDispatcherFactoryがあります。
internal class AndroidDispatcherFactory : MainDispatcherFactory {

    override fun createDispatcher(allFactories: List<MainDispatcherFactory>): MainCoroutineDispatcher {
        val mainLooper = Looper.getMainLooper() ?: throw IllegalStateException("The main looper is not available")
        return HandlerContext(mainLooper.asHandler(async = true))
    }

    override fun hintOnError(): String = "For tests Dispatchers.setMain from kotlinx-coroutines-test module can be used"

    override val loadPriority: Int
        get() = Int.MAX_VALUE / 2
}これがFactory実装です。LooperからMainLooperを取得しています。LooperはAndroidの1本のThreadでメッセージや処理を順番に取り出して実行し続けるための仕組みです。MainLooperはMain Threadに紐づいているLooperになります。ちなみにHandlerはLooperに処理を投入するためのクラスになります。
createDispatcherでHandlerContextを作成しています。HandlerContextはHandlerDispatcherを継承しており、HandlerDispatcherはMainCoroutineDispatcherを継承しています。
// ui/kotlinx-coroutines-android/src/HandlerDispatcher.kt
override fun isDispatchNeeded(context: CoroutineContext): Boolean {
    return !invokeImmediately || Looper.myLooper() != handler.looper
}

// HandlerContext
internal class HandlerContext private constructor(
    private val handler: Handler,
    private val name: String?,
    private val invokeImmediately: Boolean
) : HandlerDispatcher(), Delay {
    /**
     * Creates [CoroutineDispatcher] for the given Android [handler].
     *
     * @param handler a handler.
     * @param name an optional name for debugging.
     */
    constructor(
        handler: Handler,
        name: String? = null
    ) : this(handler, name, false)
}上記にように定義されています。Dispatchers.MainはHandlerContextでありinvokeImmediatelyはfalseで作成されるので、isDispatchNeededは常にtrueになることがわかりました。
// We inline it to save an entry on the stack in cases where it shows (unconfined dispatcher)
// It is used only in Continuation<T>.resumeCancellableWith
@Suppress("NOTHING_TO_INLINE")
internal inline fun resumeCancellableWith(result: Result<T>) {
    val state = result.toState()
    if (dispatcher.safeIsDispatchNeeded(context)) {
        _state = state
        resumeMode = MODE_CANCELLABLE
        dispatcher.safeDispatch(context, this)
    } else {
        executeUnconfined(state, MODE_CANCELLABLE) {
            if (!resumeCancelled(state)) {
                resumeUndispatchedWith(result)
            }
        }
    }
}
かなり話を戻してdispatcher.safeIsDispatchNeeded(context)の話に戻ります。テストでもない限りMain/IO/Defaultのどれかを利用すると思うtrueのケースを見ていきます。
internal fun CoroutineDispatcher.safeDispatch(context: CoroutineContext, runnable: Runnable) {
    try {
        dispatch(context, runnable)
    } catch (e: Throwable) {
        throw DispatchException(e, this, context)
    }
}safeDispatchはdispatcher.dispatch(context, runnable) を呼び出し、RunnableのdispatchをDispatcherに依頼します。dispatch処理で例外が発生した場合は DispatchException で包んで再throwします。第二引数渡したthisはDispatchedContinuationでした。DispatchedContinuationはTaskを継承しておりTaskはRunnableであることは前述しました。次に、CoroutineDispatcherのdispatchを確認します。CoroutineDispatcherなのでMain/IO/Defaultで処理は異なります。まずはDefaultSchedulerのdispatchを見て見ましょう。
internal object DefaultScheduler : SchedulerCoroutineDispatcher(
    CORE_POOL_SIZE, MAX_POOL_SIZE,
    IDLE_WORKER_KEEP_ALIVE_NS, DEFAULT_SCHEDULER_NAME
) {

    override fun limitedParallelism(parallelism: Int, name: String?): CoroutineDispatcher {
        parallelism.checkParallelism()
        if (parallelism >= CORE_POOL_SIZE) {
            return namedOrThis(name)
        }
        return super.limitedParallelism(parallelism, name)
    }

    // Shuts down the dispatcher, used only by Dispatchers.shutdown()
    internal fun shutdown() {
        super.close()
    }

    // Overridden in case anyone writes (Dispatchers.Default as ExecutorCoroutineDispatcher).close()
    override fun close() {
        throw UnsupportedOperationException("Dispatchers.Default cannot be closed")
    }

    override fun toString(): String = "Dispatchers.Default"
}
dispatchはoverrideしていません。SchedulerCoroutineDispatcherを確認しましょう。
internal open class SchedulerCoroutineDispatcher(
    private val corePoolSize: Int = CORE_POOL_SIZE,
    private val maxPoolSize: Int = MAX_POOL_SIZE,
    private val idleWorkerKeepAliveNs: Long = IDLE_WORKER_KEEP_ALIVE_NS,
    private val schedulerName: String = "CoroutineScheduler",
) : ExecutorCoroutineDispatcher() {

    override val executor: Executor
        get() = coroutineScheduler

    // This is variable for test purposes, so that we can reinitialize from clean state
    private var coroutineScheduler = createScheduler()

    private fun createScheduler() =
        CoroutineScheduler(corePoolSize, maxPoolSize, idleWorkerKeepAliveNs, schedulerName)

    override fun dispatch(context: CoroutineContext, block: Runnable): Unit = coroutineScheduler.dispatch(block)
    ....
}
dispatchはcoroutineScheduler#dispatchを呼んでいます。CoroutineSchedulerはcreateSchedulerで作成しています。CoroutineSchedulerのdispatchを見てみます。CoroutineSchedulerはかなり前に確認したRunnableをQueueに詰めて実行するクラスでした。
@Suppress("NOTHING_TO_INLINE")
internal class CoroutineScheduler(
    @JvmField val corePoolSize: Int,
    @JvmField val maxPoolSize: Int,
    @JvmField val idleWorkerKeepAliveNs: Long = IDLE_WORKER_KEEP_ALIVE_NS,
    @JvmField val schedulerName: String = DEFAULT_SCHEDULER_NAME
) : Executor, Closeable {

   fun dispatch(block: Runnable, taskContext: TaskContext = NonBlockingContext, fair: Boolean = false) {
        trackTask() // this is needed for virtual time support
        val task = createTask(block, taskContext)
        val isBlockingTask = task.isBlocking
        // Invariant: we increment counter **before** publishing the task
        // so executing thread can safely decrement the number of blocking tasks
        val stateSnapshot = if (isBlockingTask) incrementBlockingTasks() else 0
        // try to submit the task to the local queue and act depending on the result
        val currentWorker = currentWorker()
        val notAdded = currentWorker.submitToLocalQueue(task, fair)
        if (notAdded != null) {
            if (!addToGlobalQueue(notAdded)) {
                // Global queue is closed in the last step of close/shutdown -- no more tasks should be accepted
                throw RejectedExecutionException("$schedulerName was terminated")
            }
        }
        // Checking 'task' instead of 'notAdded' is completely okay
        if (isBlockingTask) {
            // Use state snapshot to better estimate the number of running threads
            signalBlockingWork(stateSnapshot)
        } else {
            signalCpuWork()
        }
    }
}
dispatchの第二引数のTaskContextはBooleanのaliasです。NonBlockingContextはfalseを意味しており、falseのケースのみ見ていきます。dispatchの処理は引数に渡したRunnableをkotlinx.coroutinesの内部クラスであるTaskに変換しQueueに詰めていることがわかります。最後に呼んでいるsignalCpuWorkを確認します。
fun signalCpuWork() {
    if (tryUnpark()) return
    if (tryCreateWorker()) return
    tryUnpark()
}
tryUnparkを見て見ましょう。
private fun tryUnpark(): Boolean {
    while (true) {
        val worker = parkedWorkersStackPop() ?: return false
        if (worker.workerCtl.compareAndSet(PARKED, CLAIMED)) {
            LockSupport.unpark(worker)
            return true
        }
    }
}
WorkerはThreadのことを意味しています。parkは待機中を意味しており、待機して仕事をしていないThreadを探していることがわかります。見つからなかればfalseを返し、見つかれば排他制御でそのWorkerをLockしています。
次にtryCreateWorkerを確認します。
private fun tryCreateWorker(state: Long = controlState.value): Boolean {
    val created = createdWorkers(state)
    val blocking = blockingTasks(state)
    val cpuWorkers = (created - blocking).coerceAtLeast(0)
    /*
        * We check how many threads are there to handle non-blocking work,
        * and create one more if we have not enough of them.
        */
    if (cpuWorkers < corePoolSize) {
        val newCpuWorkers = createNewWorker()
        // If we've created the first cpu worker and corePoolSize > 1 then create
        // one more (second) cpu worker, so that stealing between them is operational
        if (newCpuWorkers == 1 && corePoolSize > 1) createNewWorker()
        if (newCpuWorkers > 0) return true
    }
    return false
}
createdで返却される数は、CPU用に動いているWorker数+Blocking Task用に動いているWorker数の合計です。 そのため、created - blocking によってCPU処理に利用できるWorker数を概算し、それがcorePoolSize未満ならWorkerを補充します。Worker全体の上限は別途maxPoolSizeで管理されています。
コメントにもあるように最小の1つ目のWorkerを作成し、PoolSizeも2つ以上ある場合はもう一個Workerを作成し、Taskを複数Worker間でStealできるようにしているようです。
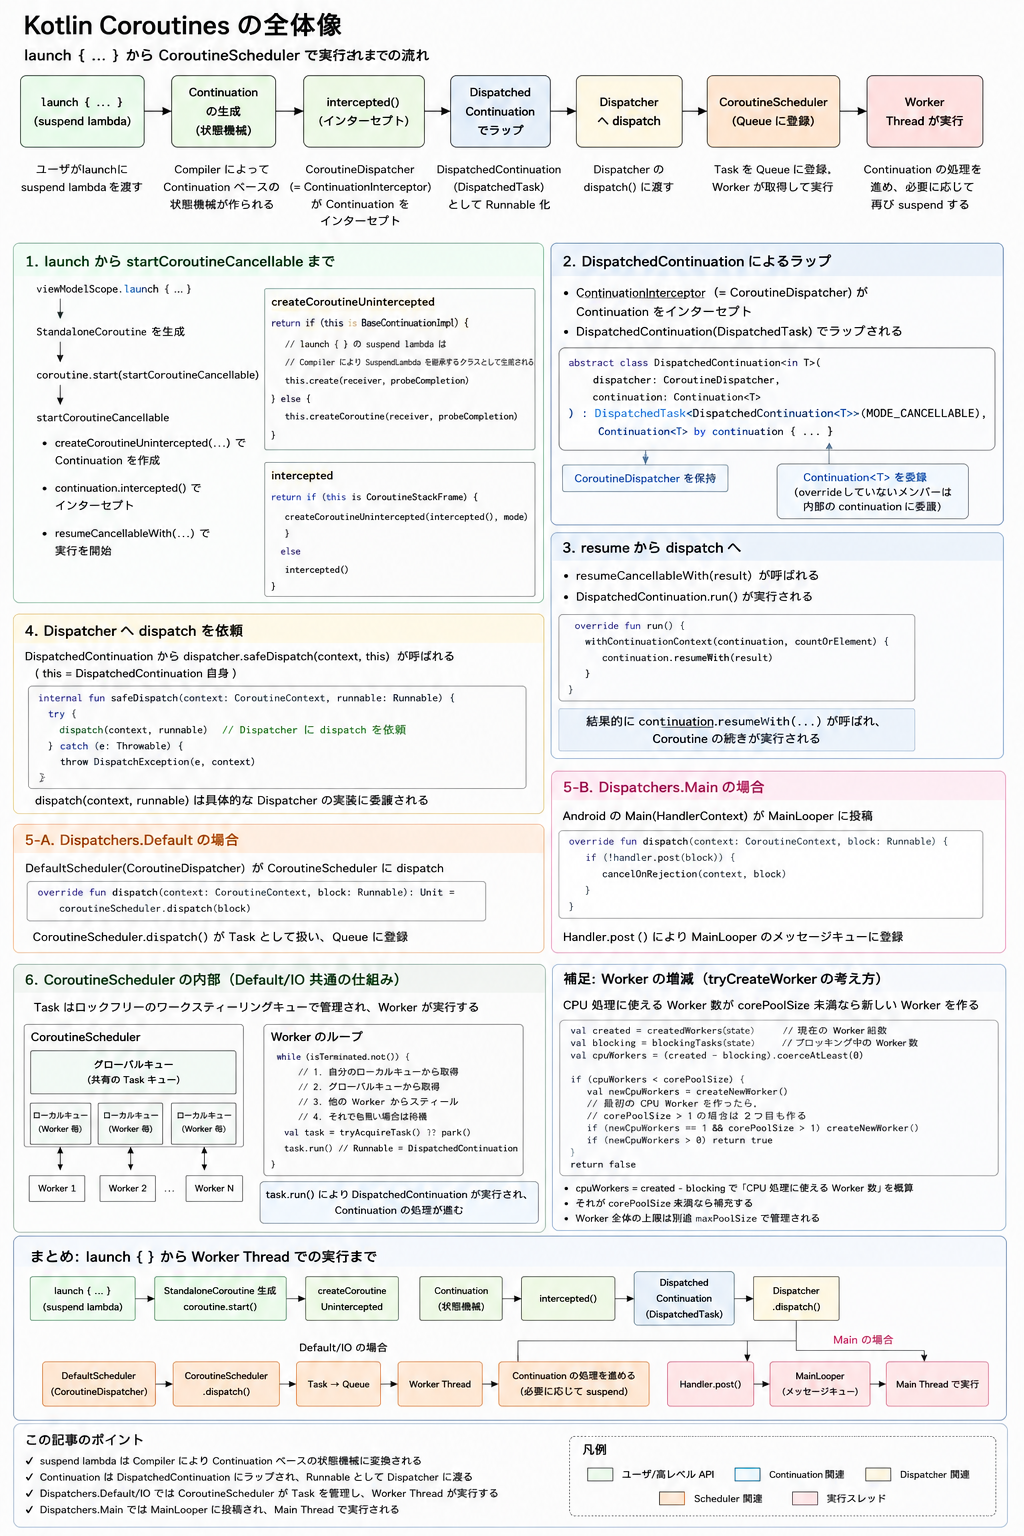
長くなりましたが、launchに渡したsuspend lambdaはCompilerによってContinuationベースの状態機械として扱われます。launchの開始時にはそのContinuationがDispatchedContinuationにラップされ、Dispatcherへ渡されます。Dispatchers.Defaultの場合、その先でCoroutineSchedulerにRunnableとして渡され、TaskとしてQueueに登録され、Worker Threadによって実行されます。
ここまでのまとめ画像です。
参考リンク
CoroutineScope https://github.com/Kotlin/kotlinx.coroutines/blob/master/kotlinx-coroutines-core/common/src/CoroutineScope.kt
CoroutineContext https://github.com/JetBrains/kotlin/blob/master/libraries/stdlib/src/kotlin/coroutines/CoroutineContext.kt
CoroutineContext#newCoroutineContext https://github.com/Kotlin/kotlinx.coroutines/blob/master/kotlinx-coroutines-core/jvm/src/CoroutineContext.kt
AbstractCoroutine https://github.com/Kotlin/kotlinx.coroutines/blob/master/kotlinx-coroutines-core/common/src/AbstractCoroutine.kt
StandaloneCoroutine https://github.com/Kotlin/kotlinx.coroutines/blob/3eadf938b1506351bffd7c015445d08faf1c4315/kotlinx-coroutines-core/common/src/Builders.common.kt#L519
CoroutineStart https://github.com/Kotlin/kotlinx.coroutines/blob/master/kotlinx-coroutines-core/common/src/CoroutineStart.kt
createCoroutineUnintercepted https://github.com/JetBrains/kotlin/blob/703468519639e6931301e1580027fd44c9765577/libraries/stdlib/jvm/src/kotlin/coroutines/intrinsics/IntrinsicsJvm.kt#L123
ContinuationImpl.kt(RestrictedContinuationImpl・ContinuationImpl) https://github.com/JetBrains/kotlin/blob/master/libraries/stdlib/jvm/src/kotlin/coroutines/jvm/internal/ContinuationImpl.kt
Continuation.intercepted https://github.com/JetBrains/kotlin/blob/master/libraries/stdlib/jvm/src/kotlin/coroutines/intrinsics/IntrinsicsJvm.kt#L181
ContinuationInterceptor.kt https://github.com/JetBrains/kotlin/blob/1c0cd183633bed42d411e376ff6a32dc204e4310/libraries/stdlib/src/kotlin/coroutines/ContinuationInterceptor.kt
CoroutineDispatcher.kt https://github.com/Kotlin/kotlinx.coroutines/blob/master/kotlinx-coroutines-core/common/src/CoroutineDispatcher.kt
resumeCancellableWithInternal https://github.com/Kotlin/kotlinx.coroutines/blob/3eadf938b1506351bffd7c015445d08faf1c4315/kotlinx-coroutines-core/common/src/internal/DispatchedContinuation.kt#L274
safeIsDispatchNeeded https://github.com/Kotlin/kotlinx.coroutines/blob/3eadf938b1506351bffd7c015445d08faf1c4315/kotlinx-coroutines-core/common/src/internal/DispatchedContinuation.kt#L260
isDispatchNeeded https://github.com/Kotlin/kotlinx.coroutines/blob/3eadf938b1506351bffd7c015445d08faf1c4315/kotlinx-coroutines-core/common/src/CoroutineDispatcher.kt
DefaultScheduler(Dispatchers.Defaultの実態) https://github.com/Kotlin/kotlinx.coroutines/blob/3eadf938b1506351bffd7c015445d08faf1c4315/kotlinx-coroutines-core/jvm/src/scheduling/Dispatcher.kt#L9
MainDispatcherLoader https://github.com/Kotlin/kotlinx.coroutines/blob/3eadf938b1506351bffd7c015445d08faf1c4315/ui/kotlinx-coroutines-android/src/HandlerDispatcher.kt#L48
CoroutineScheduler https://github.com/Kotlin/kotlinx.coroutines/blob/3eadf938b1506351bffd7c015445d08faf1c4315/kotlinx-coroutines-core/jvm/src/scheduling/CoroutineScheduler.kt#L92
まとめ
Coroutineとはsuspenionポイントで処理の停止と再開ができ、効率的に処理を進めることができることがわかりました。またlaunchからどのようにThreadに処理が渡るのかを見ていきました。kotlinx.coroutinesはKotlinの言語仕様を上手く利用し、Continuationを作成しつつ、Main ThreadやWorker Threadで処理の停止と再開を行うことで効率的に並行処理を実現していることがわかりました。